


My Bullet Train
2 posters
Page 1 of 1

My Bullet Train
![]() by mattman Mon 13 Jun 2011, 6:28 am
by mattman Mon 13 Jun 2011, 6:28 am
Howdy again :D
Recently we got the RC passenger train, but that is boring as you know... My wife also had once the #4511 high speed train - so I thought I'd combine the two in a new train! It does bear some resemblance to #4511 given the use of the nose (I would get a plain one if they existed) which also dictates colour scheme, but I hope they end up being different enough.
So far it's what I would consider a proof of concept/work in progress... all the RC bits are in place and the train runs just fine but it needs some work obviously.
At the moment the build is limited by windows & roof parts, however these just got ordered on BL.
Things to do:
- Obviously fill in windows/glass
- Roof (will be the same style, though using the 1x6x3 not 1x3x3 curves)
- Change grey window at drivers cab to white
- Redesign underslung compartment - way too much flat white.
- Second carriage to be built (will be identical to one built now)
- Possibly redesign roof over RC battery pack for easier access
- Replace grey wheels on 3rd carriage with black (on order)
Let me know what you think - or if there's anything else you change I'm open to ideas
Thanks,
Matt
**************************************************************
1st update (since I'm on a roll today)
- 3rd carriage built (though need to change the colour of one set of wheels when i get them)
- redesigned underslung compartment (thanks wifey for the idea :P)
Much less of the "wall of white" thing going on... yay
mattman- Sheep Dog

- Number of posts : 60
Registration date : 2011-06-03
Re: My Bullet Train
![]() by Captain Zuloo Wed 15 Jun 2011, 4:51 am
by Captain Zuloo Wed 15 Jun 2011, 4:51 am
Fantastic, you were doing well with the christmas train, and now this too! I like the use of the nose, looks good one stud higher than on the original model.
One thing I would say though, the whole train looks very stumpy. If this is the look you're going for, that's fine, but just my opinion. Also have you tested it on track? I'm wondering how the nose might take corners, looks like it may get stuck to me.
I'd be all for some photos of the three cars together, and while you're ordering things, I think it would be well worth buying another nose piece to build a second loco. To my knowledge all the Shinkansen trains have a loco at either end and with two cars in the middle of two locos, I feel it would break up the stumpieness of the train.
Overall though, well done, I look forward to seeing the completed MOC.

Captain Zuloo- Pirate Administrator

- Title : I say alot of things
Number of posts : 777
Location : Canberra
Registration date : 2009-03-21 -

Re: My Bullet Train
![]() by mattman Wed 15 Jun 2011, 11:42 am
by mattman Wed 15 Jun 2011, 11:42 am
Yeah I think it's just the photo angle that makes it look stumpy They are on 6x24 bases (all I have in white) so they aren't *long* cars but it looks better in real life than in photos. I haven't tried running it on a built up track as far as nose overhang on the corners hitting other stuff., but it runs fine on an oval track.
Funny you should mention the dual engine though I didn't have plans to do it on this one... but I had a BL order turn up today so i can do a second engine for my #4561 - expect a post on that soon too :P Though it's not really as big of a mod as the other 2 trains - just the extra engine to make it look more like a high-speed commuter train.
EDIT-----------------------------------------------------------
New piccies Hopefully less perspective distortion in the photos so easier to see it all. For the closeup of the engine I also rearranged the few roof pieces I have to cover one side so you can see it better. I think the lack of roof does make it look a bit funny though.


I'm also thinking of playing with the green stripe and making it 2 studs high where the stripe currently is and a 1 stud stripe immediately above the windows... don't know yet though.
Matt
They are on 6x24 bases (all I have in white) so they aren't *long* cars but it looks better in real life than in photos. I haven't tried running it on a built up track as far as nose overhang on the corners hitting other stuff., but it runs fine on an oval track.Funny you should mention the dual engine though
I didn't have plans to do it on this one... but I had a BL order turn up today so i can do a second engine for my #4561 - expect a post on that soon too :P Though it's not really as big of a mod as the other 2 trains - just the extra engine to make it look more like a high-speed commuter train.EDIT-----------------------------------------------------------
New piccies
Hopefully less perspective distortion in the photos so easier to see it all. For the closeup of the engine I also rearranged the few roof pieces I have to cover one side so you can see it better. I think the lack of roof does make it look a bit funny though.I'm also thinking of playing with the green stripe and making it 2 studs high where the stripe currently is and a 1 stud stripe immediately above the windows... don't know yet though.
Matt
mattman- Sheep Dog
- Number of posts : 60
Registration date : 2011-06-03
Re: My Bullet Train
![]() by mattman Fri 24 Jun 2011, 2:36 pm
by mattman Fri 24 Jun 2011, 2:36 pm
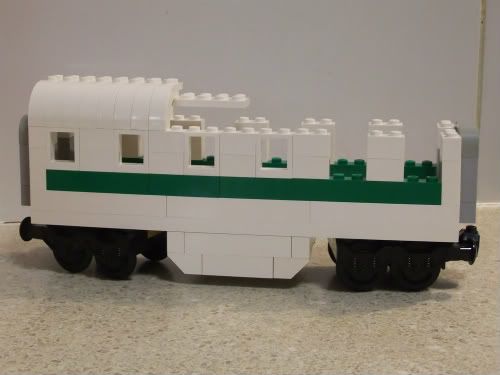
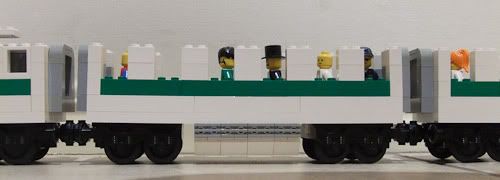
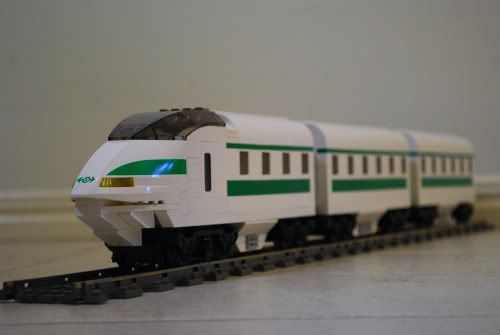
Got my bricklink order today, roof and windows complete. Fiddled with the loco again so hoping it still looks ok.
Ended up putting a 1-stud green strip immediately above the windows just to break it up a bit. Left it as a full brick below simply because i don't have enough green 1-wide plates :P
Engine has been moved forward to the front-most pinhole on the train base which helps with corner clearance. Have done some basic testing and need 1 stud clear beyond the tracks & sleepers themselves which seems ok - but i don't really know what's normally acceptable.
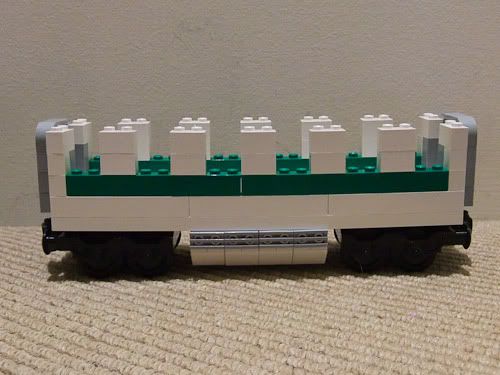
Still not massively happy with the underslung compartment... I actually like the first one in the sense that it's very obvious and that it really seems to make the train "hug" the track. The second one is better because you don't have massive chunks of white, but doesn't provide the same effect as the first. Maybe I could redesign the first but put in some SNOT to work in grilles or something.
Will post updated pictures when I work out the underneath compartment.
Ended up putting a 1-stud green strip immediately above the windows just to break it up a bit. Left it as a full brick below simply because i don't have enough green 1-wide plates :P
Engine has been moved forward to the front-most pinhole on the train base which helps with corner clearance. Have done some basic testing and need 1 stud clear beyond the tracks & sleepers themselves which seems ok - but i don't really know what's normally acceptable.
Still not massively happy with the underslung compartment... I actually like the first one in the sense that it's very obvious and that it really seems to make the train "hug" the track. The second one is better because you don't have massive chunks of white, but doesn't provide the same effect as the first. Maybe I could redesign the first but put in some SNOT to work in grilles or something.
Will post updated pictures when I work out the underneath compartment.
mattman- Sheep Dog
- Number of posts : 60
Registration date : 2011-06-03
Re: My Bullet Train
![]() by mattman Wed 29 Jun 2011, 12:31 am
by mattman Wed 29 Jun 2011, 12:31 am
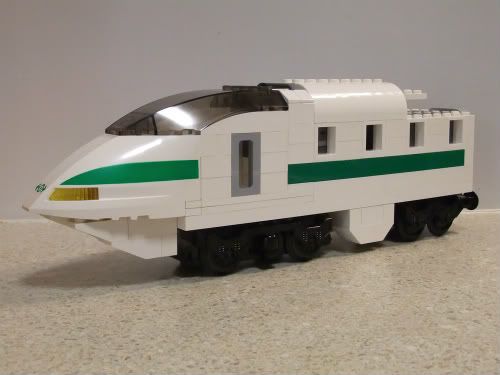
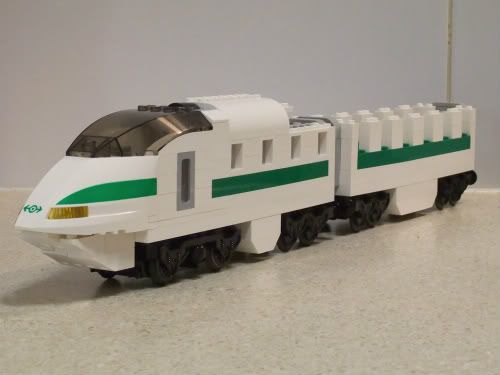
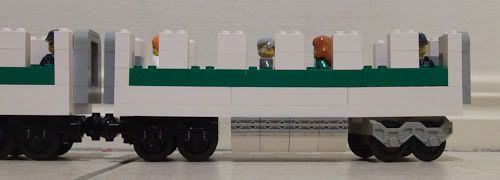
Here's some pics from the last update
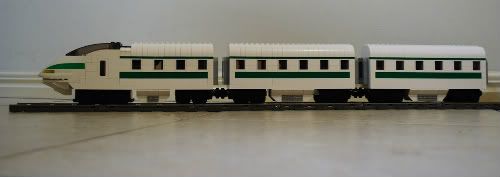
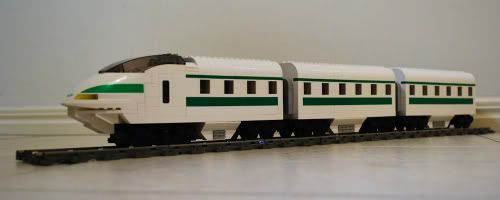
Not ready to call it finished yet, but it's getting there.
Not ready to call it finished yet, but it's getting there.
mattman- Sheep Dog
- Number of posts : 60
Registration date : 2011-06-03
Re: My Bullet Train
![]() by Captain Zuloo Thu 30 Jun 2011, 3:18 am
by Captain Zuloo Thu 30 Jun 2011, 3:18 am
That looks much better with that top green stripe.
I know what you were saying about the train hugging the track, but I don't know if you've gone the right way about it. Take the Eurostar (one of the fastest trains in the world) for example:

or the German ICE:

or even the Japanese Shinkansen (Bullet Train):

They all hug the track very closely, but their undercarriages are never white. The darker colours would not only be easier to clean, but when the train is at the platform, nobody sees the undercarriage. You have stuck with a very white based undercarriage, which is perfectly fine if that's what you're after. But do remember that white is a colour that makes things look bigger, while black makes things look smaller. We want the wheels to look as unobtrusive as possible, they ruin the streamline of the train after all. It also comes down to the boxieness I mentioned a few posts ago. By reducing the visual presence of the undercarriage and the wheels, the train will appear longer and less stumpy. Of course this would also be assisted by the addition of another loco on the other end too.
But to illustrate my point further, LEGO addressed this issue when they released the very train you're basing this MOC on.
It certainly hugs the track, and reduces the stumpieness that the train is otherwise guilty of. The use of the grey as opposed to the white that the rest of the train is based on, it makes the train look longer, and (in my opinion anyway), better.
Good luck!
I know what you were saying about the train hugging the track, but I don't know if you've gone the right way about it. Take the Eurostar (one of the fastest trains in the world) for example:
or the German ICE:
or even the Japanese Shinkansen (Bullet Train):
They all hug the track very closely, but their undercarriages are never white. The darker colours would not only be easier to clean, but when the train is at the platform, nobody sees the undercarriage. You have stuck with a very white based undercarriage, which is perfectly fine if that's what you're after. But do remember that white is a colour that makes things look bigger, while black makes things look smaller. We want the wheels to look as unobtrusive as possible, they ruin the streamline of the train after all. It also comes down to the boxieness I mentioned a few posts ago. By reducing the visual presence of the undercarriage and the wheels, the train will appear longer and less stumpy. Of course this would also be assisted by the addition of another loco on the other end too.
But to illustrate my point further, LEGO addressed this issue when they released the very train you're basing this MOC on.
It certainly hugs the track, and reduces the stumpieness that the train is otherwise guilty of. The use of the grey as opposed to the white that the rest of the train is based on, it makes the train look longer, and (in my opinion anyway), better.
Good luck!
Captain Zuloo- Pirate Administrator
- Title : I say alot of things
Number of posts : 777
Location : Canberra
Registration date : 2009-03-21 -
Re: My Bullet Train
![]() by mattman Thu 30 Jun 2011, 2:45 pm
by mattman Thu 30 Jun 2011, 2:45 pm
That's a good point :D
I'd love to cover the wheels but no way to do it on 6-wide obviously..doesn't help that lego tracks are much sharper corners than real trains need to allow for. I've got a free day tomorrow so might give it a shot with other colours. Will try dark grey and black and see what works best.
I'm also going to have a play with the front window again too, will see how successful my ideas are before i post anything because it just may end up looking totally silly :P
mattman- Sheep Dog
- Number of posts : 60
Registration date : 2011-06-03
Page 1 of 1
Permissions in this forum:
You cannot reply to topics in this forum

